
If you have ever sat through a call where your face looked lit by a flashlight under your chin, or worse, you were basically a dark outline in front of a bright window, you already know why fixing video call lighting matters more than almost any other home office upgrade. I spent close to two years running calls out of a spare bedroom with a single ceiling fixture overhead, and I looked rough on every single one. A coworker joked I was calling in from a cave. I wasn't, I was just lit badly, and bad video call lighting is one of the easiest problems in a home office to actually fix, usually in under an hour and for less than the cost of a nice dinner out.
This is the guide I wish someone had handed me back then. It is the same walkthrough we give readers on Best Home Office Setup Hub whenever this question comes up, because it comes up constantly: why does my video call lighting look worse than it did on the office webcam, and what is the fastest fix that does not involve rearranging the whole room. The short answer is a dedicated key light, positioned correctly, with brightness and color temperature you can actually control. The long answer is the five steps below, using the UBeesize 10 inch key light as the reference tool since it is the one I tested this process with, but the steps apply to any similar desk light.
Stop guessing with lamps and start controlling your light directly
The UBeesize 10 inch key light clamps to your desk, adjusts on an arm to eye level, and lets you dial brightness and color temperature from an app or the base dial. It is the single fastest fix for washed-out or shadowy video call lighting.
Amazon Check Today's Price on Amazon →Step 1: Diagnose why your video call lighting actually looks bad
Before buying anything, figure out which specific problem you have, because bad video call lighting is rarely one thing. The three most common causes I see in home offices are backlighting from a window behind you, a single overhead fixture casting shadows down across your eyes and under your chin, and mismatched color temperature where a warm yellow bulb is fighting with the cool blue glow of your laptop screen. Each one needs a slightly different fix, so guessing and buying a random ring light off Amazon often solves the wrong problem.
To diagnose it, open your webcam app's preview (Zoom, Meet, whatever you use daily) in a dark room with only your current lighting setup on, no other apps or filters running. Look at your own shadows. If there is a hard shadow line down one side of your nose, that is a single-source problem, usually the overhead light or a lamp on only one side of the desk. If your face is dim while the window behind you is blown out and bright, that is backlighting. If your skin tone looks slightly green or orange compared to how you look in a mirror, that is a color temperature mismatch.
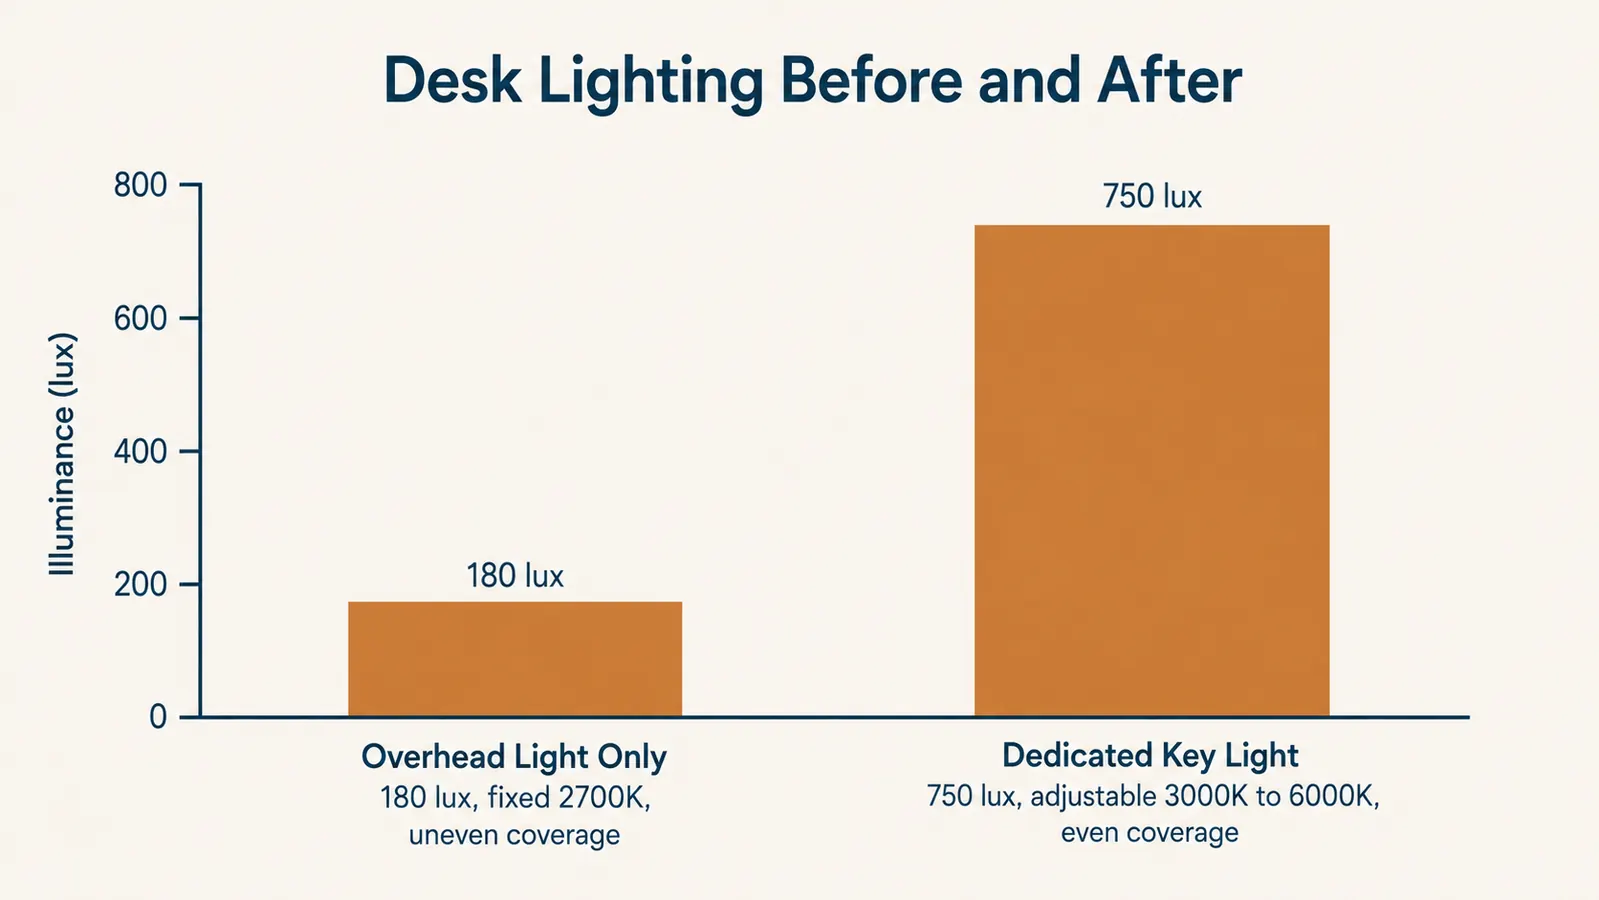
If you want an actual number instead of a guess, a free light meter app on your phone will give you a rough lux reading. Most people working under a single ceiling bulb are sitting somewhere around 150 to 200 lux at desk height, which is fine for reading a spreadsheet but noticeably dim on camera, since a well-lit face on a video call generally reads better somewhere north of 500 lux. You do not need to be precise about this, but having a baseline number makes it obvious how big the gap is before you fix it.
Write down which of the three you are dealing with, because it changes how aggressively you need to fix it. Backlighting from a west-facing window in the afternoon is a bigger problem than a slightly warm overhead bulb, and it is the one most people underestimate until they see themselves as a silhouette on a recorded meeting.
Step 2: Kill the backlighting and stop relying on the overhead fixture
This step costs nothing. If you have a window behind your desk, either turn your desk 90 degrees so the window is to your side instead of behind you, or close the blinds during calls and let a dedicated light do the work instead. I resisted moving my desk for months because I liked the view, and I looked like a hostage negotiation on every single call as a result. Once I turned the desk sideways, half the problem disappeared before I ever touched a light.
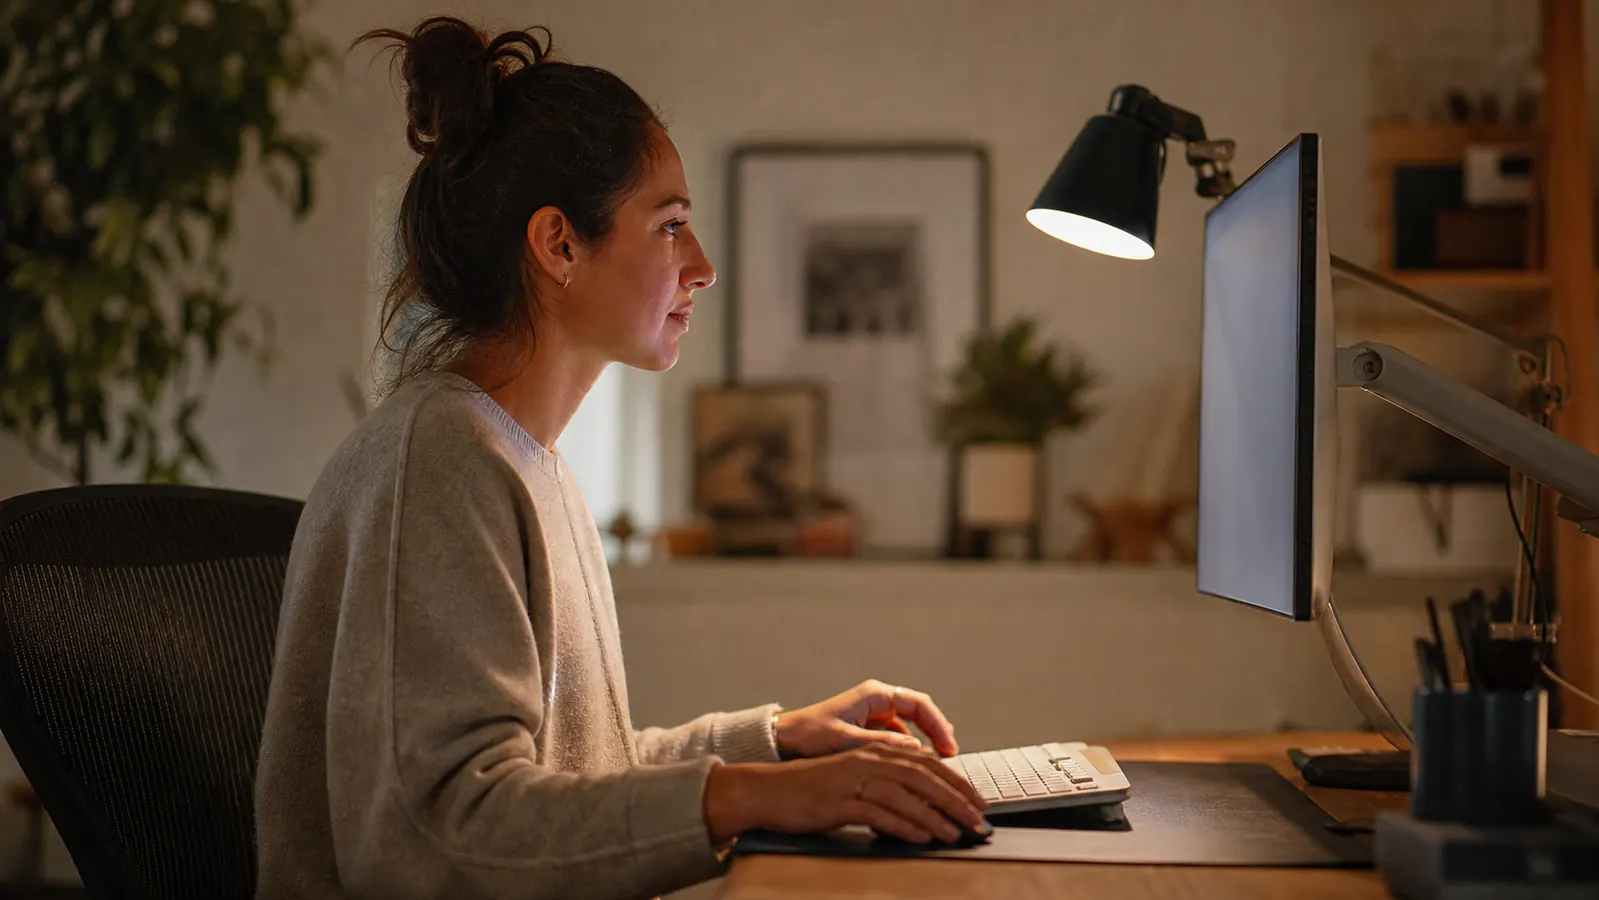
Next, turn off the overhead fixture, or at minimum dim it, during video calls. Ceiling lights sit almost directly above your head, which pushes shadows down into your eye sockets and under your nose and chin, the exact look that makes people appear tired or older than they are on camera. It is fine for reading or working, but it is a bad primary light source for video. Think of the overhead light as ambient fill, not your main light.
These two changes alone fix maybe 40 percent of a typical bad video call lighting setup, but they will not get you to genuinely good lighting on their own. You still need a controllable light source aimed at your face from the front, which is where a key light comes in.
Step 3: Set up a dedicated key light at the right height and distance
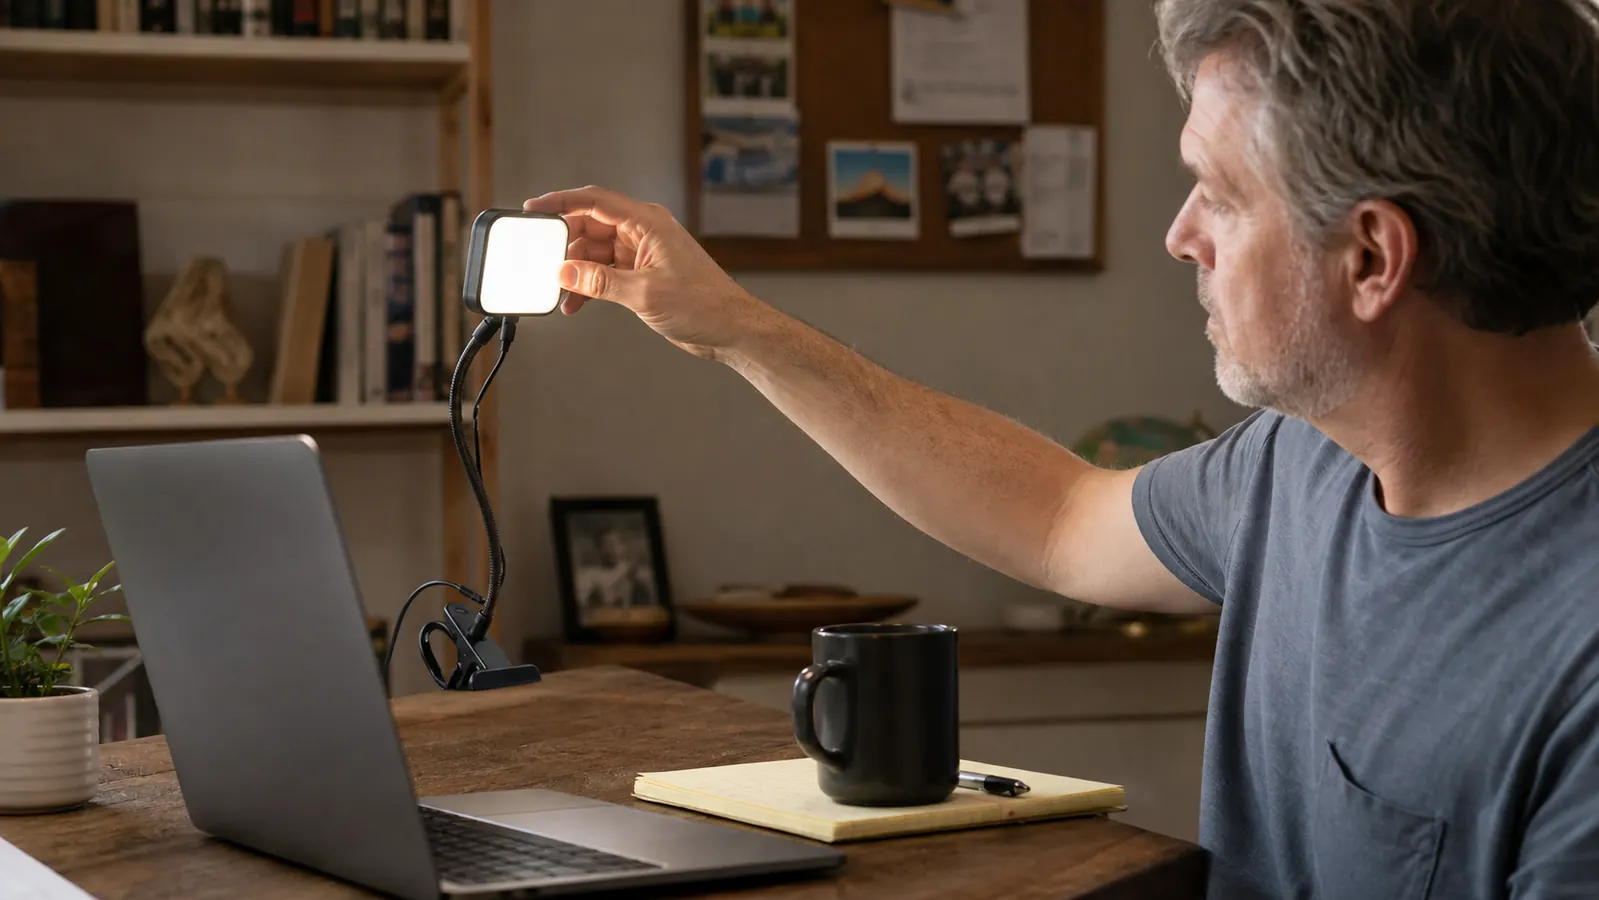
A key light is just a small, bright, adjustable light positioned to be your main light source on camera, and this is the piece most home offices are missing entirely. The UBeesize 10 inch key light clamps directly to the edge of a desk with a C-clamp mount, extends on an articulating arm, and folds down to about the size of a large dinner plate when you are not using it. At 39.99 as of this writing, it is priced close to a nice pair of headphones, which surprised me given how much difference it made compared to the ring lights I had tried before.
Position matters more than the light itself. Clamp the arm so the light head sits roughly at your eye level or just slightly above it, angled down at about 45 degrees toward your face, and place it 18 to 24 inches away, either directly in front of your webcam or just off to one side. If it sits too low it lights you from below like a campfire story, and if it is too far to the side you are back to the single-shadow problem from step one. I keep mine clamped to the left edge of my monitor, angled in, and it clears my keyboard entirely.
If you rent and cannot clamp anything to shared furniture, or your desk edge is too thick for the C-clamp to grip, a small weighted desk stand version works almost as well, you just lose a bit of height range compared to the arm mount. Either way, the goal is the same: get the light roughly at eye level and angled toward your face rather than sitting flat on the desk pointing straight up, which creates its own unflattering under-lighting.
Cable management is a small but real annoyance here. The UBeesize runs off a USB cable rather than a wall plug, which means you can power it from a laptop dock or a powered USB hub instead of hunting for another outlet, but route the cable along the monitor arm or desk edge so it is not dangling across your keyboard where it will get caught every time you reach for your mouse.
Step 4: Dial in brightness and color temperature for your room
This is the step people skip, and it is the difference between a light that looks professional and one that looks like an interrogation. The UBeesize key light adjusts through its companion app or the physical dial on the base, with color temperature ranging roughly from 3000K, a warm amber tone, up to 6000K, a cool daylight tone. For most home offices with warm indoor bulbs elsewhere in the room, I land around 4000K to 4500K, which reads as neutral on camera without looking clinical.
Brightness should match the room, not max out the light. Start around 50 percent and increase gradually while watching your own webcam preview. If your face looks blown out and pale, or if colleagues start squinting on calls, back it down. I run mine closer to 60 percent during the day when there is some ambient light in the room, and closer to 80 percent after sunset when the key light is doing nearly all the work.
It is worth testing two settings and saving them, one for daytime and one for evening, since the ambient light in most rooms shifts a lot between 9am and 6pm. A light that looks perfect at noon will often look washed out and flat once the sun goes down and the rest of the room gets darker around it.
One thing nobody warns you about: if you wear glasses, a key light placed directly in front of your face at full brightness will bounce straight back into the lens and create a glare spot that hides your eyes completely on camera. Angling the light slightly to one side, even just 15 or 20 degrees off center, usually clears the glare without losing much of the flattering effect on your face.
Step 5: Test on an actual call and adjust your camera settings
Once the light is positioned and dialed in, do not just trust the webcam preview screen, which auto-adjusts exposure and can hide problems. Record yourself on an actual test call, or join a meeting five minutes early and watch your own tile, then play it back. This is where I caught that my webcam was auto-exposing for the bright key light and dimming my background to near black, which looked artificial and a little strange.
If your webcam software has a manual exposure or brightness lock, like Zoom's 'Adjust for low light' toggle set to manual instead of auto, use it once your key light is on. Auto-exposure fights with a strong key light constantly, brightening and dimming in small increments that are distracting on a call, especially a recorded one. Locking it manually after your light is set gives a stable, consistent picture.
Do one more pass at eye level too. If your webcam sits below your eyeline, on a laptop lid rather than a raised monitor, you will be lit fine but still shot from a bad angle, staring down into the camera. That is a separate fix from lighting, but the two problems compound each other, so it is worth checking both while you are already tuning the setup.
What Else Helps
A good key light solves most of the problem, but a few smaller things round it out. Keep your background reasonably tidy since a bright key light will also light up whatever is behind you, and clutter that was invisible under dim overhead lighting suddenly gets noticed. If your webcam is a few years old, consider that the sensor itself might be the limiting factor, no amount of lighting fixes a genuinely low-resolution camera.
If you share a home office with a partner or roommate, a light with app control rather than only a physical dial makes it much easier to have separate saved settings for each person's calls, instead of re-adjusting a tiny dial by feel every time you sit down. And if your video calls run back to back for hours, keep the brightness a notch lower than what looks perfect on a single test call, since a light that is comfortable for five minutes can feel harsh on your eyes by the third meeting of the day.
Nobody ever complimented my overhead ceiling light. People started commenting on how I looked the week I clamped on a key light instead.
The fastest single upgrade for how you show up on camera
If bad video call lighting is costing you a professional look on daily meetings, the UBeesize key light fixes the three most common causes at once: backlighting, harsh overhead shadows, and mismatched color temperature.
Amazon Check Today's Price on Amazon →