
I spent four years working with my laptop propped on a stack of paperback books, and my neck let me know about it every afternoon around two o'clock, like clockwork. If you've ever caught yourself rubbing the base of your skull after a long stretch of video calls, there's a decent chance the real problem isn't your chair, it's where your screen sits. Mounting a screen on a monitor arm changes the geometry of your whole workday in a way a new chair alone never quite does. This guide walks through exactly how to mount a monitor arm so your screen ends up at true eye level instead of six inches below it, using the same steps I followed the week I fixed my own setup with a VIVO Single Monitor Arm.
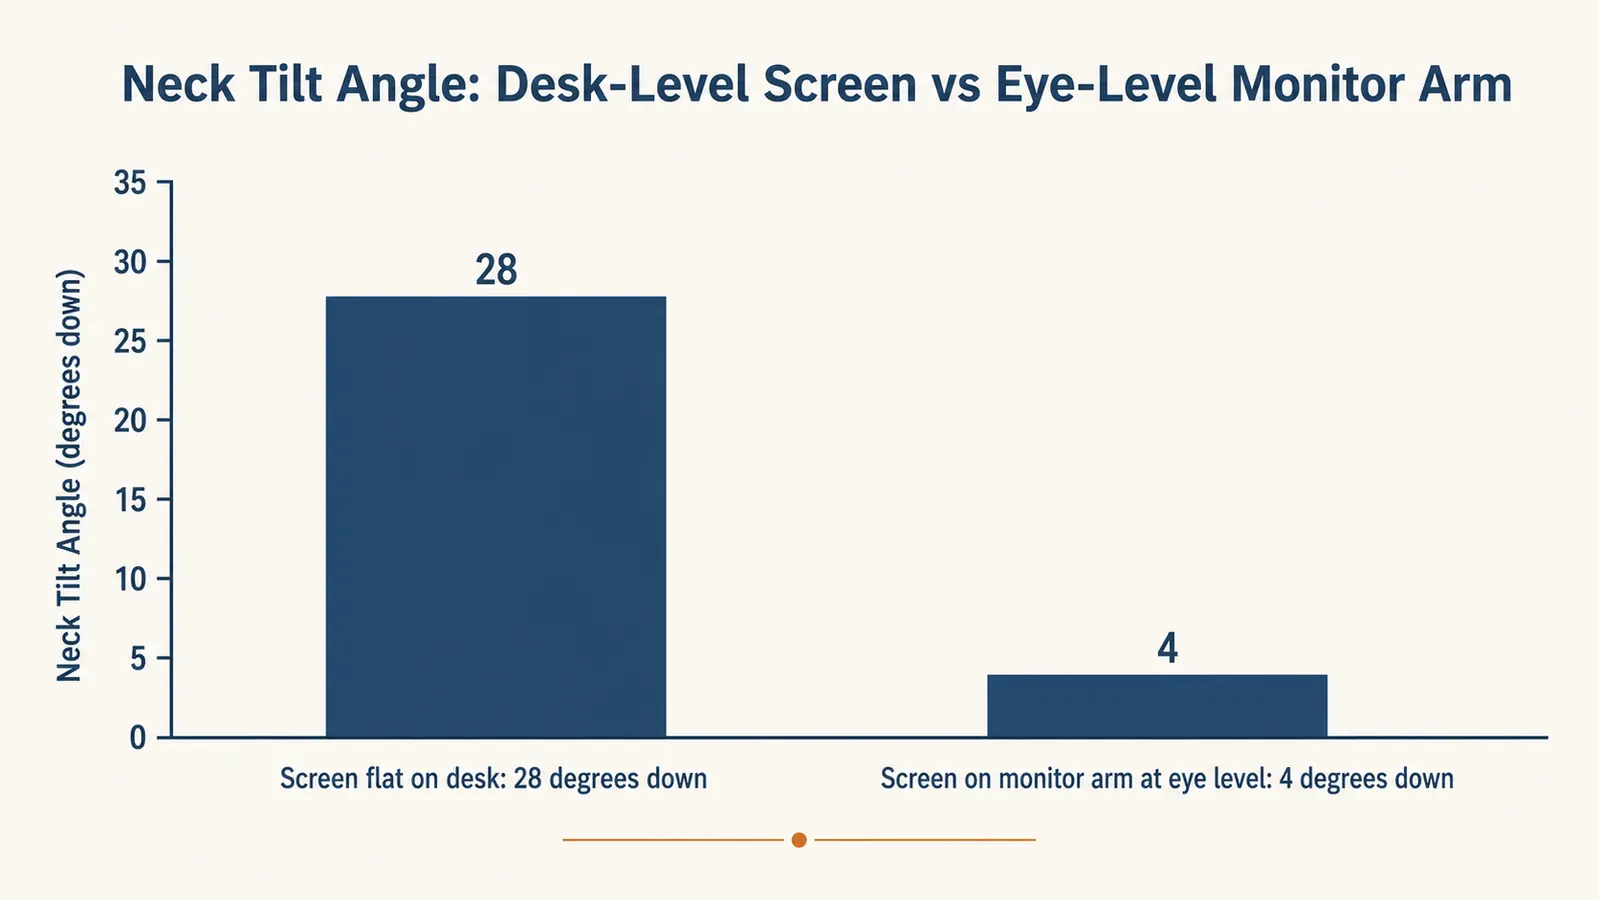
I write about home office gear for Best Home Office Setup Hub, and out of every desk upgrade I've tested, mounting a monitor arm is the one that fixes posture fastest for the least money. A laptop screen sits about six to ten inches below true eye level when it rests flat on a desk, which forces your neck into a forward tilt for hours at a stretch. A monitor arm lifts the screen, tilts it, and locks it in place at the height your eyes actually rest at when you sit up straight, no books, no boxes, no stack of old textbooks under a laptop. It's roughly a thirty five dollar fix for a problem that a three hundred dollar chair can't solve by itself. Below are the five steps I follow every time I mount a monitor arm, whether it's my own desk or someone else's.
Stop Tilting Your Neck Down All Day
The VIVO Single Monitor Arm holds screens from 13 to 38 inches, clamps to nearly any desk edge, and gets your screen to eye level in about 20 minutes. It's rated 4.5 stars from more than 20,000 buyers.
Amazon Check Today's Price on Amazon →Before you start, gather what you actually need: the monitor arm itself, the hex key it ships with (you won't need a separate toolkit for most models), a tape measure, and about twenty minutes of quiet time so you're not doing this one-handed while also on a call. If your monitor didn't come with the four VESA screws already threaded into the back, check the small parts bag that came with the monitor arm, most kits include an assortment sized for both 75mm and 100mm patterns. I've mounted probably a dozen of these over the years, and the whole job, start to finish, has never taken me more than 25 minutes, even the first time.
Step 1: Measure Your Desk Edge and Clamp Space
Before you mount a monitor arm, check what kind of desk edge you're actually working with. Most monitor arms, the VIVO Single included, clamp to a desk edge between about 0.4 and 3.5 inches thick using a C-clamp or grommet mount. Measure your desk thickness with a tape measure at the spot where you plan to mount the arm, usually the back corner near your keyboard. If your desk has a metal support bar or a cable tray running along the back edge, mount a few inches to the side of it instead of directly behind your keyboard, or the clamp will fight the hardware underneath.
Also check what's underneath the desk at that spot. A grommet mount needs a drilled hole, which works fine on solid wood or laminate but is a bad idea on a glass desktop. A clamp mount needs enough clearance below the desk surface for the clamp body to close, usually two to three inches of open space. I mounted mine about four inches to the right of center on a 30 inch deep desk, which left enough swing room to pull the screen toward me without the base bumping into my keyboard tray.
One more thing worth checking before you commit to a spot: sit down at your desk in your normal position and picture where the arm's base post will end up relative to your monitor's final position. A monitor arm with a short first joint segment can end up crowding your keyboard if you clamp it too close to center, while clamping it too far to one side can leave the screen off-center from where you actually sit. I like to set a book or a stack of paper roughly where the screen will land before I even open the clamp, just to eyeball the spacing.
Step 2: Attach the Base and Assemble the Arm
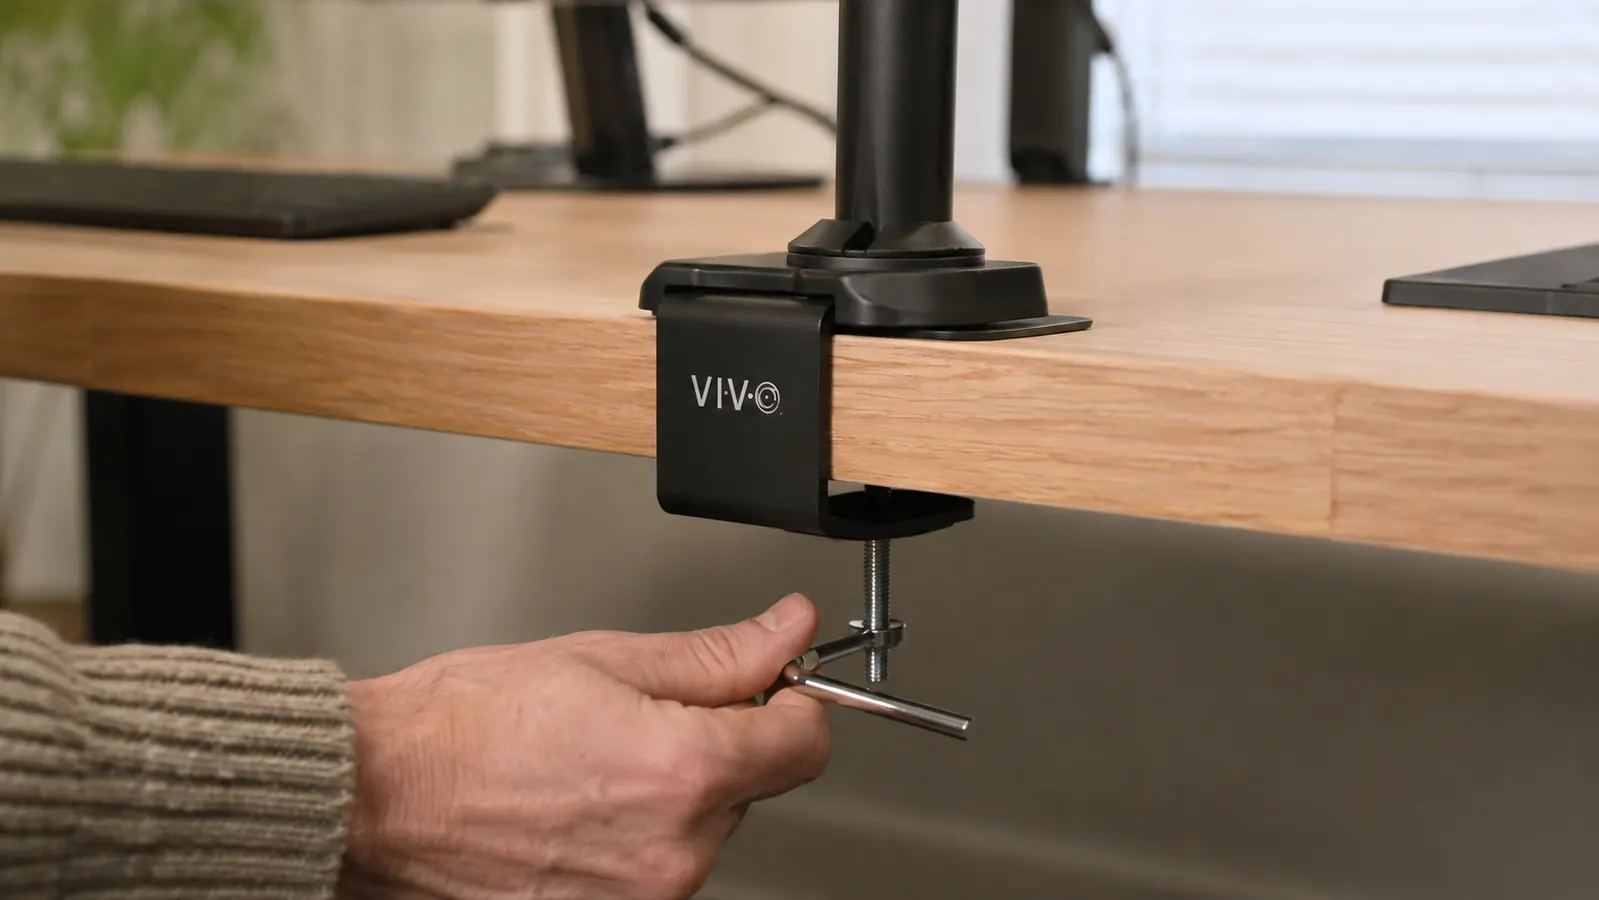
Once you know your clamp spot, attach the base of the monitor arm first, before you touch the monitor at all. Slide the clamp under the desk edge and hand-tighten the bolt until the base stops wobbling, then give it another half turn with the included hex key. You want it snug enough that you can't rock the base side to side, but you don't need to crank it down with your full body weight, the clamp mechanism is built to hold under normal desk use, not to be welded on.
Next, thread the arm sections into the base post. Most monitor arms, the VIVO included, ship with the gas spring pre-installed in the main arm, so this step is usually just dropping the arm assembly onto the base post and securing a set screw. Do this part before you attach the monitor. Trying to assemble the arm with a twenty pound monitor already hanging off it is how people either drop a screen or throw their back out reaching around it.
If your desk sits on carpet or an uneven floor, double check that the desk itself isn't rocking before you tighten the clamp all the way down. A wobbly desk will make a monitor arm feel unstable even when the clamp itself is perfectly tight, and it's an easy thing to blame on the arm when the real culprit is a short desk leg. A folded piece of cardboard under the low leg fixed this for me on an old desk long before I ever touched the monitor arm itself.
Step 3: Attach the Monitor and Set It to Eye Level
Check the back of your monitor for a VESA mounting pattern, either 75x75mm or 100x100mm, before you buy or mount anything. Nearly every monitor made in the last fifteen years has one, but a handful of ultra-thin or curved displays don't, so it's worth a ten second check first. Screw the VESA plate onto the back of the monitor, then click or bolt the plate onto the monitor arm's mounting head.
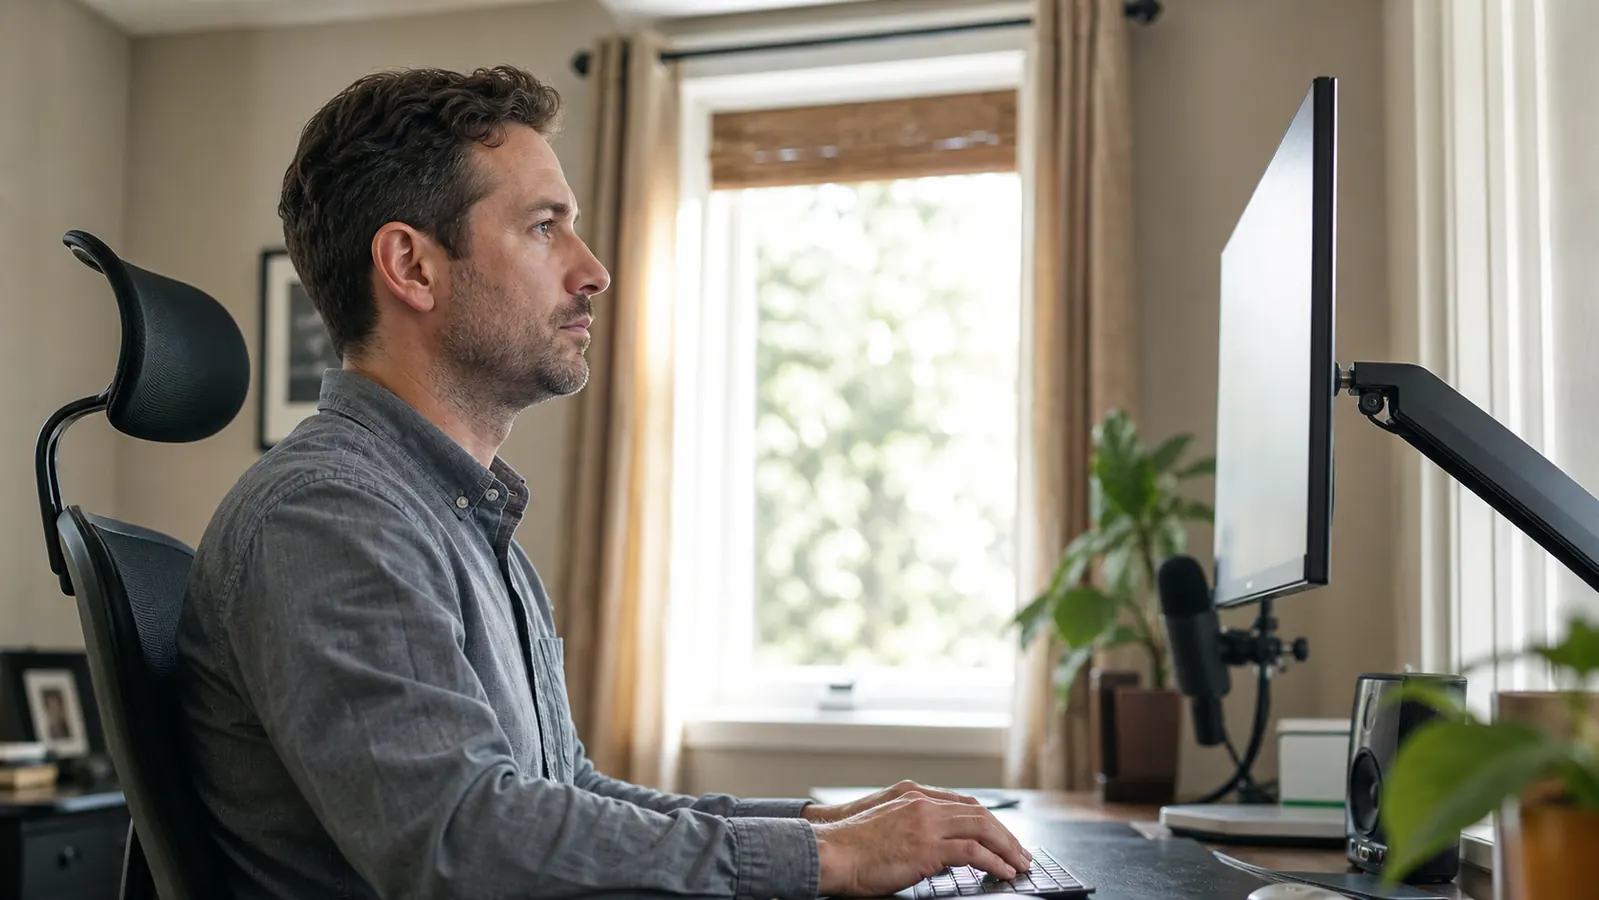
Here's the part that actually fixes your posture: sit in your normal chair, look straight ahead without tilting your chin up or down, and mark roughly where your eyes land on a wall or doorframe. That mark, not "as high as it will go," is where the top third of your monitor should sit. For most people sitting in a standard office chair, that puts the top of the screen somewhere between 42 and 48 inches off the floor. Adjust the monitor arm's height until the top of the screen lines up with that eye-level mark, not with where it happened to land out of the box.
If your monitor is heavier than the arm's rated capacity, don't force it. The VIVO Single is rated for screens up to 22 lbs, which covers the vast majority of 24 to 32 inch monitors, but a large ultrawide or an older, thicker monitor can push past that limit. Check the weight printed on the box or in the manual before you mount it, an arm that's straining under too much weight will sag no matter how well you set the tension.
Step 4: Adjust Reach, Tilt, and Swivel
With the height set, pull the arm toward you until the screen sits about an arm's length away, roughly 20 to 28 inches from your face depending on your eyesight and screen size. Too close and you'll find yourself leaning back to focus, too far and you'll lean forward, which undoes the whole point of raising the monitor arm in the first place.
Tilt the screen back very slightly, two to five degrees, so the top of the display leans a touch away from you. This cuts glare from overhead lights and keeps your neck neutral instead of craning up to see the top edge. Swivel the arm so the screen faces you dead-on rather than at an angle, which matters more than people expect when a desk sits at an angle to a window or another light source.
Take a full workday to live with the first setting before you decide it's wrong. It's normal to want to nudge the height an inch higher or lower the first few times you sit down, your neck and eyes need a day or two to stop defaulting to the old slouched position out of habit. I readjusted mine three times in the first week before it finally felt automatic instead of something I had to think about.
Step 5: Fine-Tune the Tension and Manage the Cables
Most gas-spring monitor arms, including the VIVO, have a small tension adjustment screw on the side of the arm joint, usually accessed with the same hex key used for assembly. If the screen drifts downward on its own after you let go of it, tighten the tension screw a quarter turn at a time until it holds its position without you having to fight it to move it.
Last step, route your monitor's power and video cables through the arm's built-in cable clips or channel before you plug everything back in. This keeps the cables from pulling on the screen every time you swivel the arm, and stops them from swinging into your keyboard. Sit down, settle into your normal typing posture, and check that your eyes land on the upper third of the screen without tilting your chin up or down. If they don't, go back to Step 3 and adjust the height again, most people need a second pass after living with it for a day.
Once everything is dialed in, test the full range of motion you'll actually use, not just the resting position. Swivel the arm toward you for a video call, push it back for focused typing, then pull it down slightly if you switch to a laptop keyboard on the desk below. A monitor arm that only feels right in one fixed position isn't set up correctly yet, the whole point is that it should move with you through the day, not the other way around.
Common Mistakes That Undo the Fix
The most common mistake I see is mounting the monitor arm correctly, then never adjusting it again after the first week, even as sitting habits change. If you switch chairs, add a seat cushion, or start using a footrest, your eye height changes too, and the arm should move with it. Check your eye-level mark again anytime you change your chair or seating setup, it takes thirty seconds and it's the difference between the arm actually helping and just sitting there.
The second mistake is treating the monitor arm as the whole fix and ignoring everything else at the desk. A monitor at perfect eye level paired with a keyboard sitting too high, forcing your shoulders up toward your ears, just moves the strain from your neck to your shoulders instead of solving it. Keep your elbows at roughly a 90 degree angle with your keyboard and let the monitor arm handle the screen, not the rest of your posture.
What Else Helps
A monitor arm fixes the vertical part of the problem, but it won't fix everything on its own. Your chair still needs to support your lower back, and your feet still need to sit flat on the floor or a footrest, not dangling or tucked underneath you. If you spend most of your day on a laptop with an external keyboard and mouse, raising the laptop screen with a small stand or a second monitor arm keeps you from splitting your attention between two different eye heights all day. And if you've had neck or shoulder pain for more than a few weeks, especially pain that radiates down an arm or wakes you up at night, a monitor arm is worth trying, but it isn't a substitute for seeing a doctor. Most people I've talked to notice a difference in how their neck feels within the first week of sitting at true eye level.
The single biggest posture mistake I see in home offices is a laptop sitting flat on the desk, screen six inches below where your eyes actually rest.
Get Your Screen to Eye Level This Weekend
The VIVO Single Monitor Arm handles screens up to 32 inches, or up to 38 inch ultrawide, and mounts in under 20 minutes with either the clamp or grommet option, whichever fits your desk. Current price is under $40.
Amazon Check Today's Price on Amazon →